Adding smooth locomotion to your UE5 VR Project.
- Jonathan Bardwell
- Jun 22, 2021
- 17 min read
This tutorial was made possible by my Patreons. If you'd like to support more content like this please consider subscribing to the GDXR Youtube tutorial or by becoming a Patreon: https://www.patreon.com/GameDevXR
In this tutorial, I'm going to show you how to set up your own smooth locomotion system similar to that found within Half-Life Alyx and other similar VR Games.
If you followed along to my previous Half-Life Alyx movement system and tried implementing it into UE5 you might find it no longer works. This is due to the new template working quite differently from the UE4 template meaning we have to do some extra steps to make it work. If you would like to download the files used to create this project then you can do so by becoming a Patreon.
1. Setting Up Our Custom Inputs.
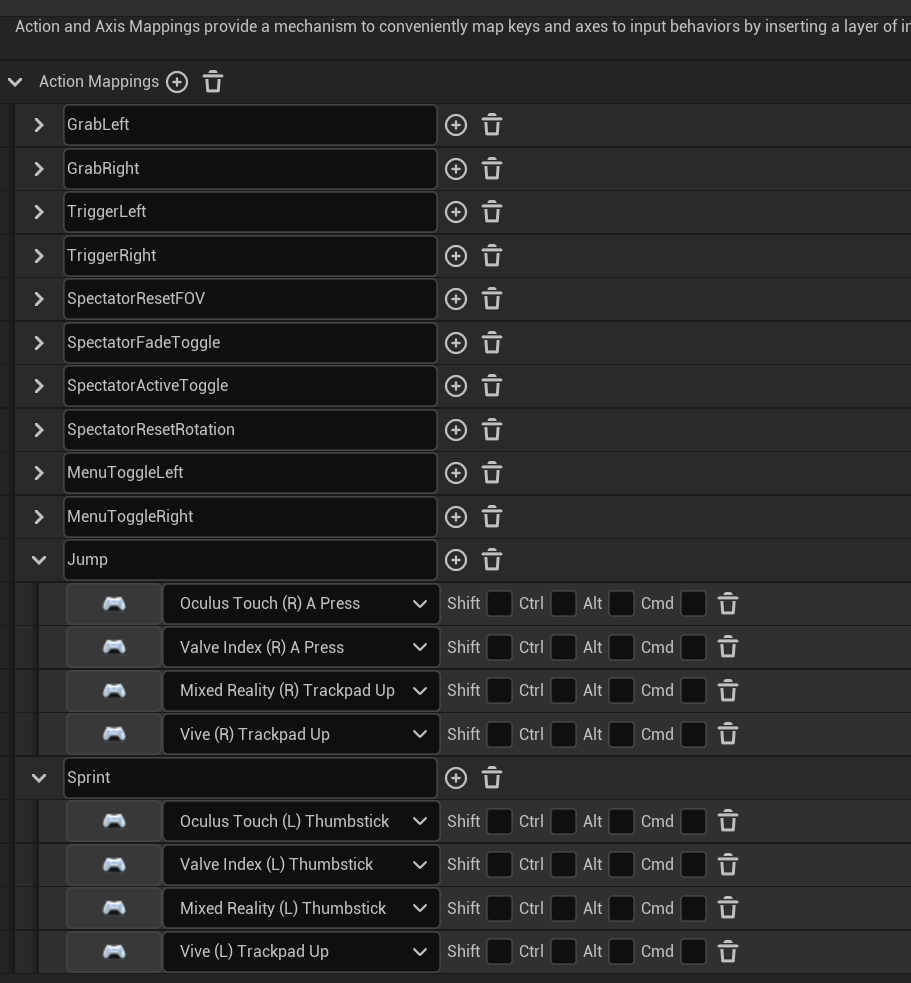
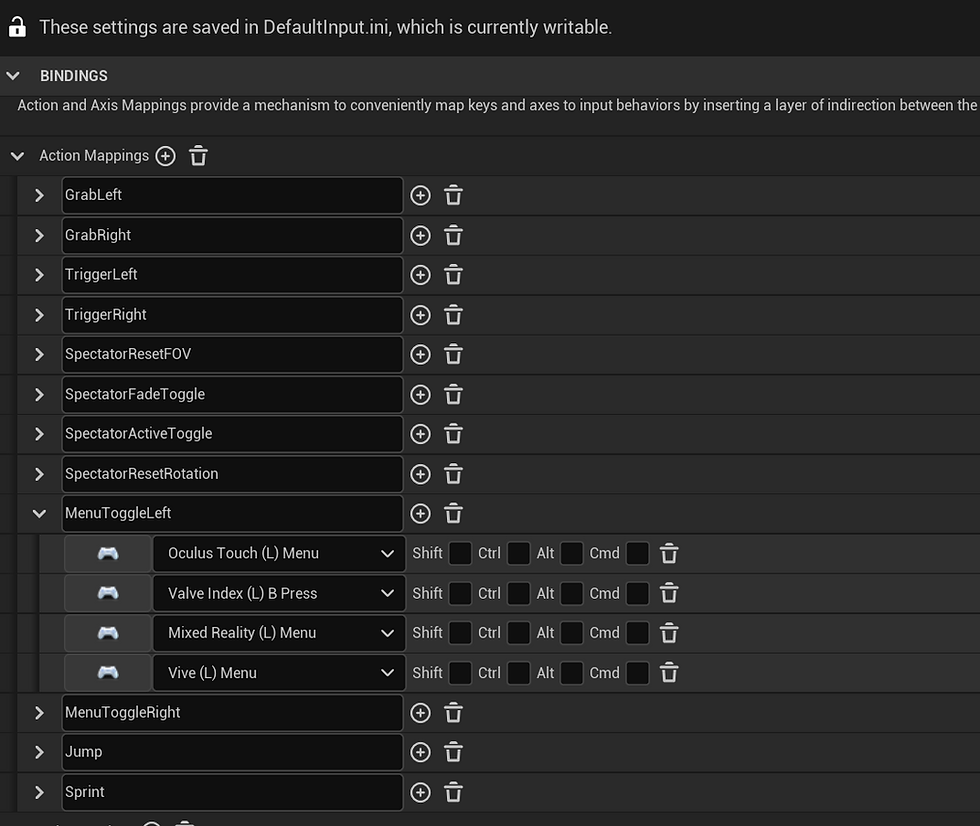
The first thing we need to do before setting up our player character is adding in our custom inputs. To do this we will first need to head over to Project Settings > Input. If this is your first time in here then you will notice that we have quite a few inputs already included in the project. What we need to do is add in our Sprint Input and Our Jump button.
Were going to do this by adding them to our Action Mappings section at the top here.

Press the plus next to action mappings twice to add two new actions. Were going to name the first one Sprint and the second Jump. Now we can add the inputs we want to use for our template. In my case, I'm going to add inputs for a couple of devices but you can add the inputs only required for the platform your using.
2. Setting up a custom collision preset
Staying in our project settings were going to head over to the collision tab and create our own custom Preset. This will come in handy later on when we are trying to grab our interactable objects.

At the bottom of the list, there is a heading called "PRESET" you will need to extend this and you will then be shown a list of current presets within the engine. Were going to use it to create our own.
And to do this you need to select New on the right-hand side of the window. In the New Profile box which appears name it VRInteractable.
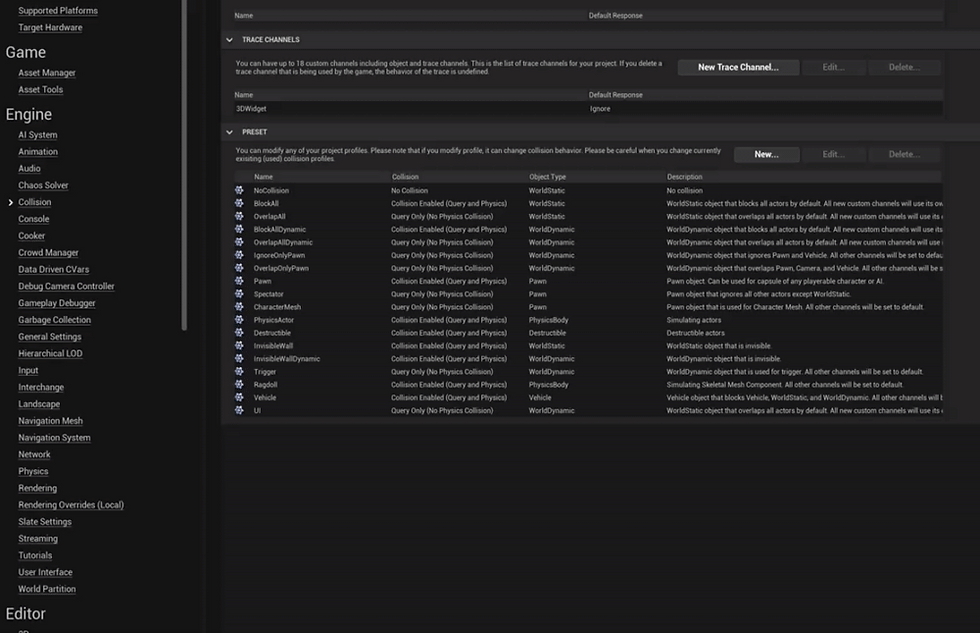
We then need to modify some of the current settings.
CollisionEnabled = Collision Enabled (Query and Physics).
Object Type = PhysicsBody
Description = Add To Any VR Interactable To Stop It Colliding With The Player
We then need to change the trace channel for Pawn to be Overlap. So your settings should now look like this.

We can now press Accept and close our project settings as were done with it. We can now modify our VRPawn and start coding our movement.
3. Setting up our VR Pawn and Components.
The first thing we need to do is open up our VR Pawn Blueprint.
By default, our VR Pawn is of the parent class pawn. We need to convert it to a character Class.
We can do this by selecting Class Settings at the top of our event graph and changing our Parent Class to Character.

Make sure to compile to apply our new changes.
If you look at the components panel on the left you will see it's changed and we now have a player capsule and mesh component. But before we move on we need to add a new component as a child of the capsule.
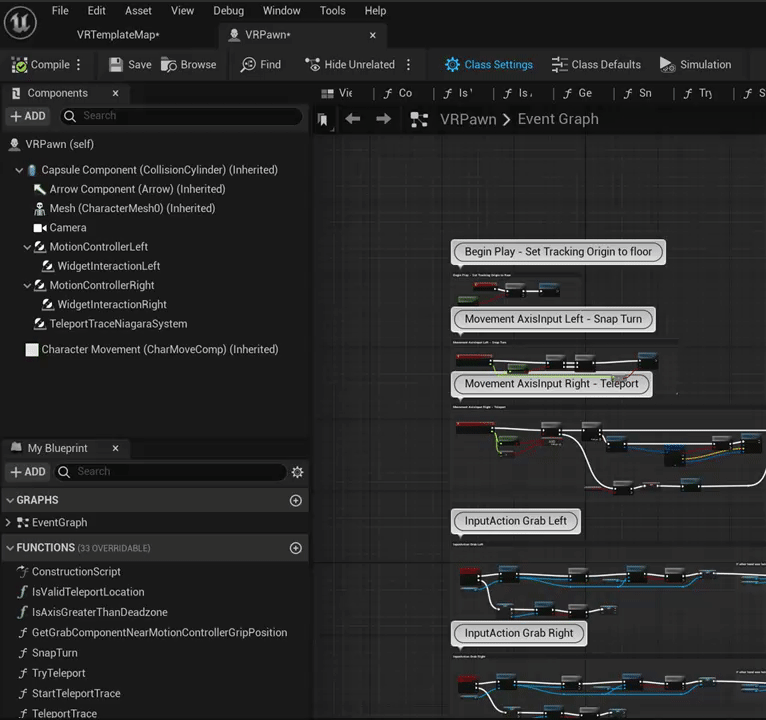
Make sure to name it VROrigin.
Now we need to select: MotionControllerLeft
WidgetInteractionLeft
MotionControllerRight
WidgetInteractionRight
TeleportTraceNiagaraSystem
Camera
And were going to make these a child of our VROrigin (SceneComponent).

It should look like this.
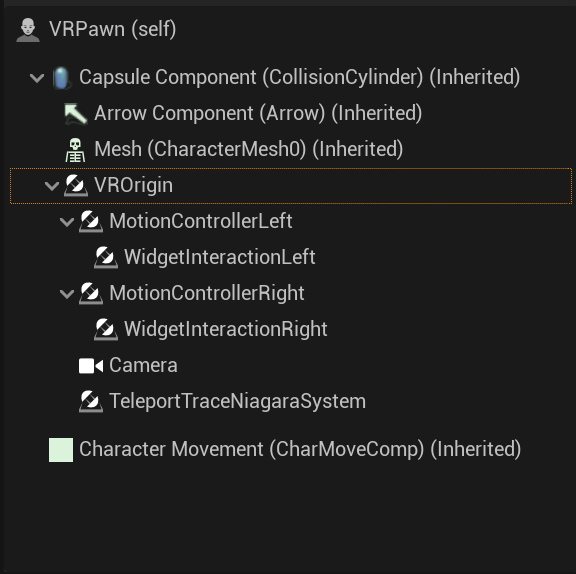
After Attaching everything to our VROrigin we need to select it and change its Z location to -90

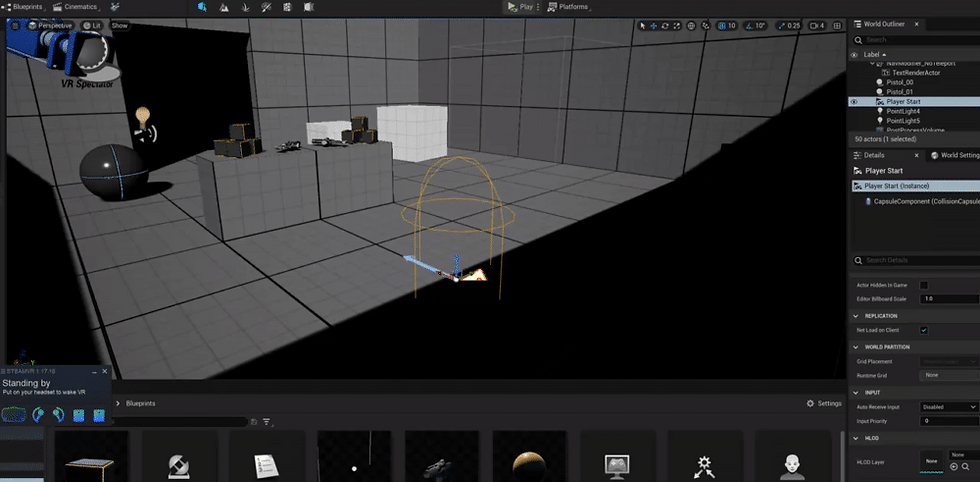
Now We have updated our VRPawn we need to quickly jump into the scene and move our player start position. so it's not intersecting with the floor as this will stop us from spawning.
We can now jump back to our VRPawn Event graph and start adding our Snap Rotation.
4. Setting Up Snap rotation
The first thing we're going to do here is to delete the existing Snap Turn code already included in the VRPawn as it doesn't work correctly for room-scale so we will create our own. We also need to delete the SnapTurn Function so we don't have spare code lying around our project.
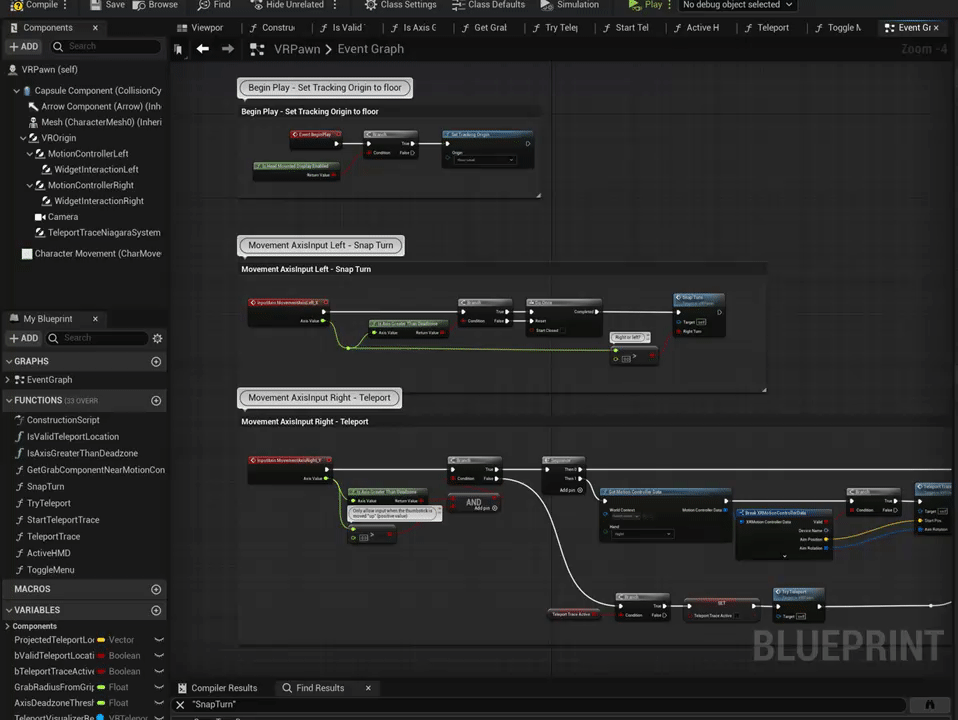
Now we've removed the existing code we have some free space to work in.
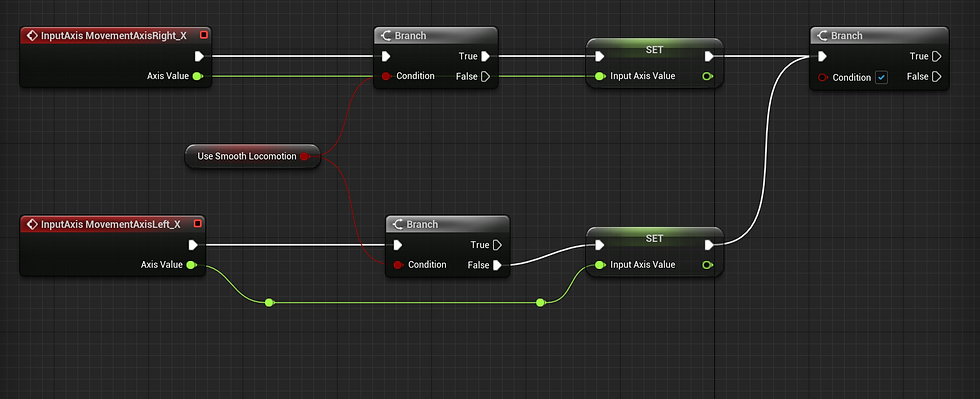
Were going to start by adding two of our existing InputAxis Mappings. MovementAxisRight_X and MovementAxisLeft_X. We're doing this because we're going to give the option of choosing between teleportation and smooth locomotion later on in the tutorial.

Were also going to add a branch to each Axis and create a New Boolean Variable called UseSmoothLocomotion. This will be used to switch between teleportation and smooth locomotion later.


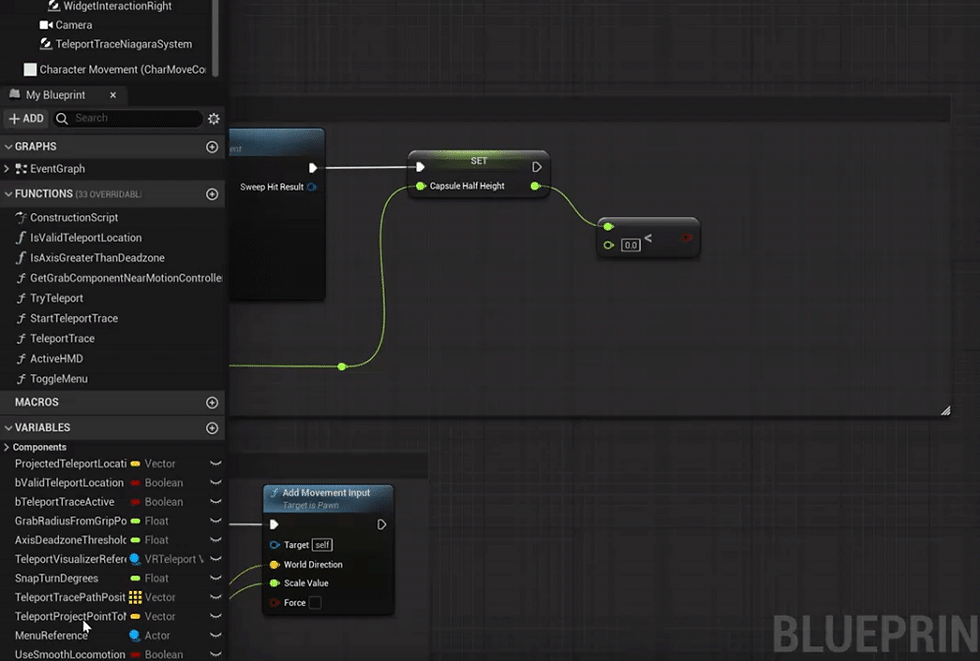
Now we have our branches we are going to create a new float variable called InputAxisValue which we will use to get the thumbstick value. You can do this by right-clicking either of the Axis Value pins on our events and promoting to a variable.

Don't make two as we will be using the same one for both events except we will connect our set InputAxisValue from our Right_X Branch to the True channel and our InputAxisValue from our Left_X Branch to the False channel. So it looks like so.
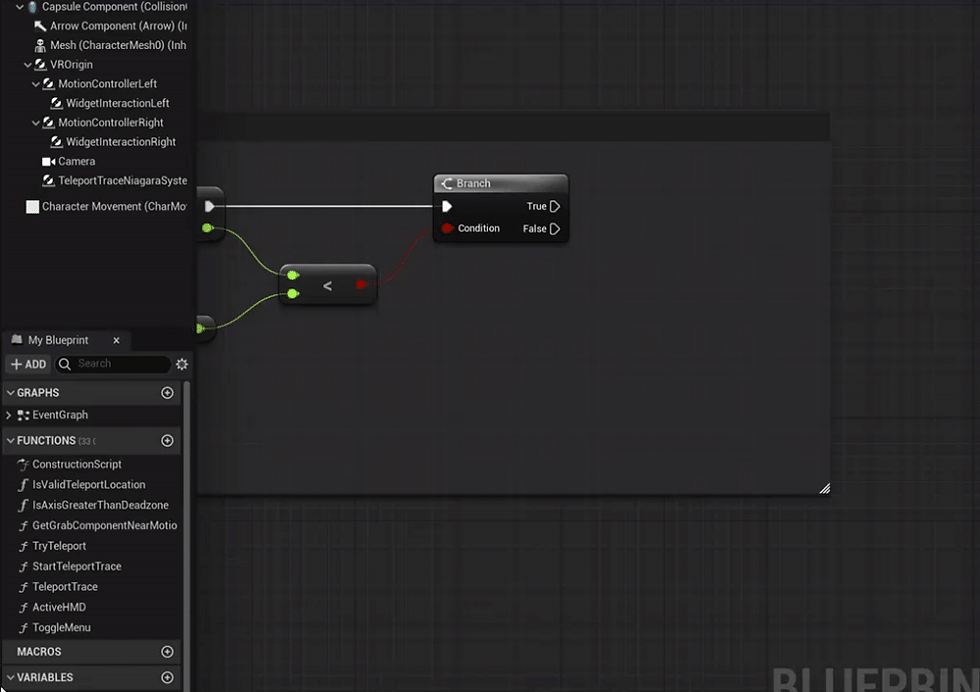
We now need to add another branch and connect both our InputAxisValues to its input pin.
This is where our code gets a little bit more complex. We need to first get our Input axis value and create two separate > greater than nodes coming from it. But we need to use an Absolute between one of them like so.

We can now add or greater than node, connected to the absolute condition input of our Branch node. And create another Branch node for our second Greater than node. We then need to create a new float variable called turn Deadzone. Make sure to set the TurnDeadzone Float value to 0.5

The next thing we need to do is create two new float variables. The first-named SnapRotationAngle and the Second one called SnapRotationValue. We only need to set our SnapRotationAngle to a rotation angle we like. I find a value of 30 to be quite nice. And we can keep SnapRotationValue set to 0.
We need to bring in One get Snap Rotation Angle (value of 30) and two Set Snap Rotation Values one connected to True and the Second connected to False. We will also connect our SnapRotationAngle to or Set SnapRotationValue from the false channel but we need to invert it for it to work for the SnapRotationValue Connected to the False Pin. And We can invert it by using a Multiply float and using a value of -1. Your code should look like this.

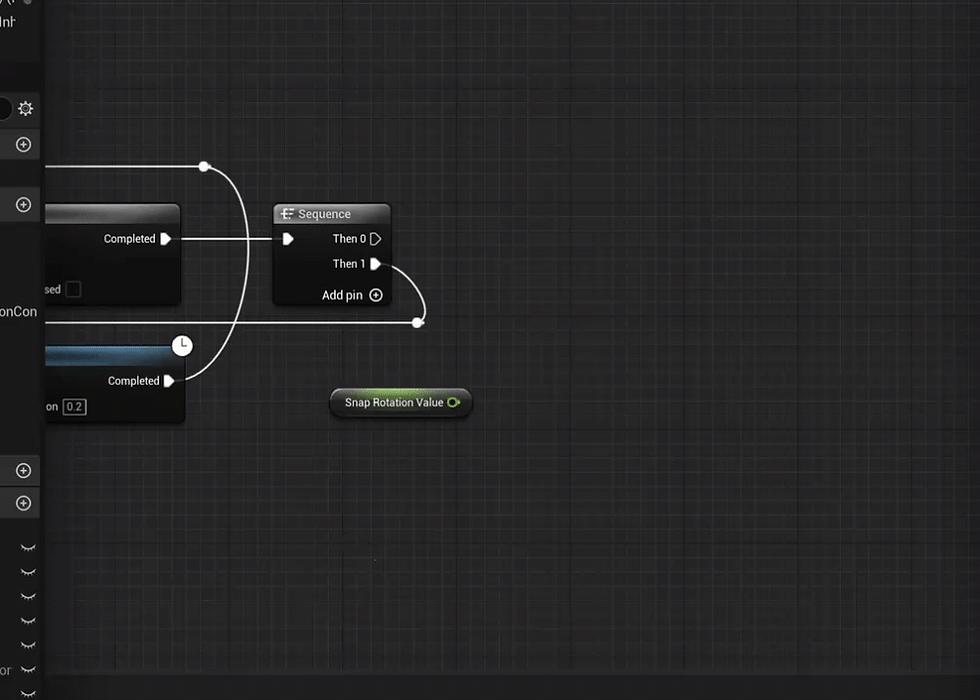
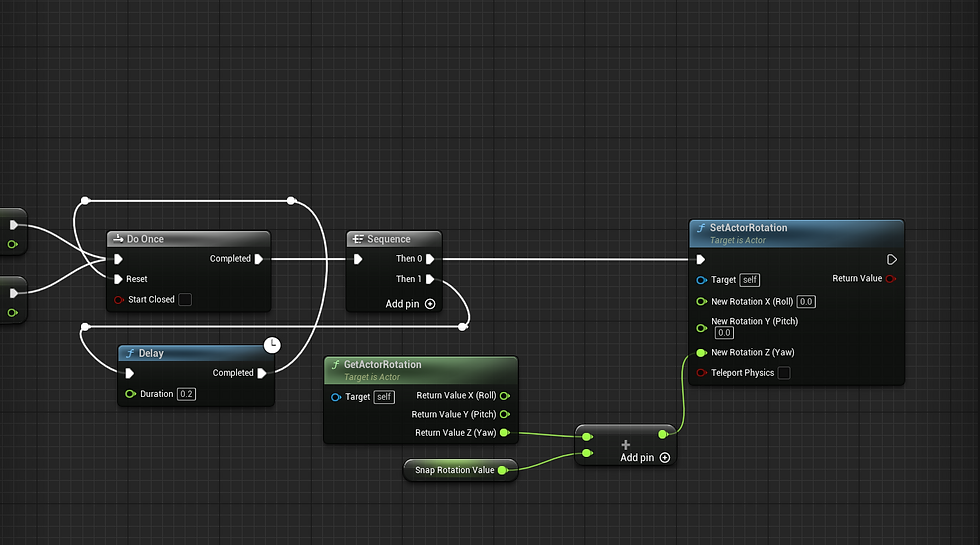
We can now connect both SnapRotationValues to a DoOnceNode followed by a sequence. from the Sequence, Then 1 pin we will add a delay node with a value of 0.2. and connect it back to the DoOnce Rest node.
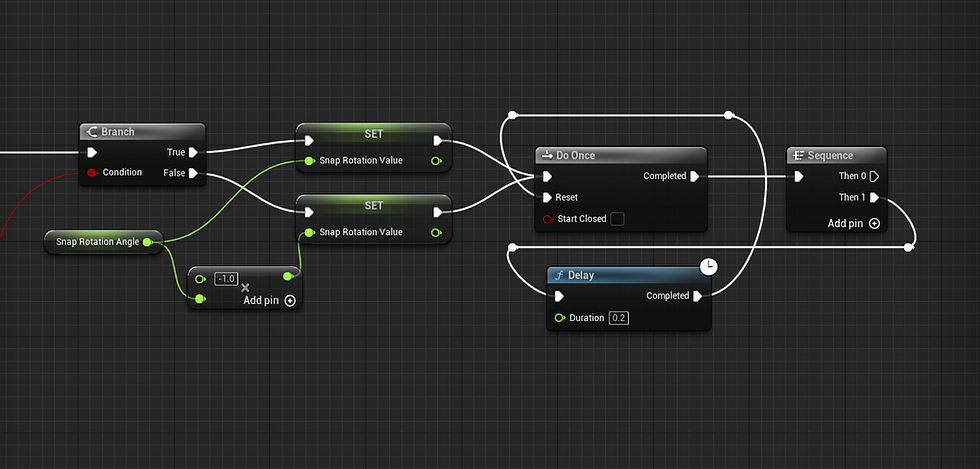
Now from our, Then 0 Pin we can create a SetActorRotation Node. We will also need a Get Actor Rotation Function. Which we will then add our SnapRotationValue To the yaw Output pin.

Once you have added the SetActorRotation and hooked it all together it should look like this.
we can now comment on our section of code by selecting everything and pressing C on the keyboard to add a comment section.

5. Setting Up Room Scale To Make Our Capsule follow our VRPawn Camera.
In this section, I want to acknowledge Victor Lerp (Creator of the UE5 template) over at Epic did a great job with this template and not using the Event Tick node within the VRPawn. If your not sure why this is impressive it's due to performance. the code in the player is now fired only when it's needed rather than on tick which results in the player being updated every frame of your game. Basically, if your game is set to 90fps (Standard VR) then that's 90 times each piece of code is fired if running from the event tick. Even if it's not being used. As you can imagine it becomes quite expensive on performance.
So we're going to keep with this improvement and use a timer to control when we update the capsule as this is something we don't need to do on tick but rather in milliseconds. And this lets us manually control the speed at which we update our capsule position.
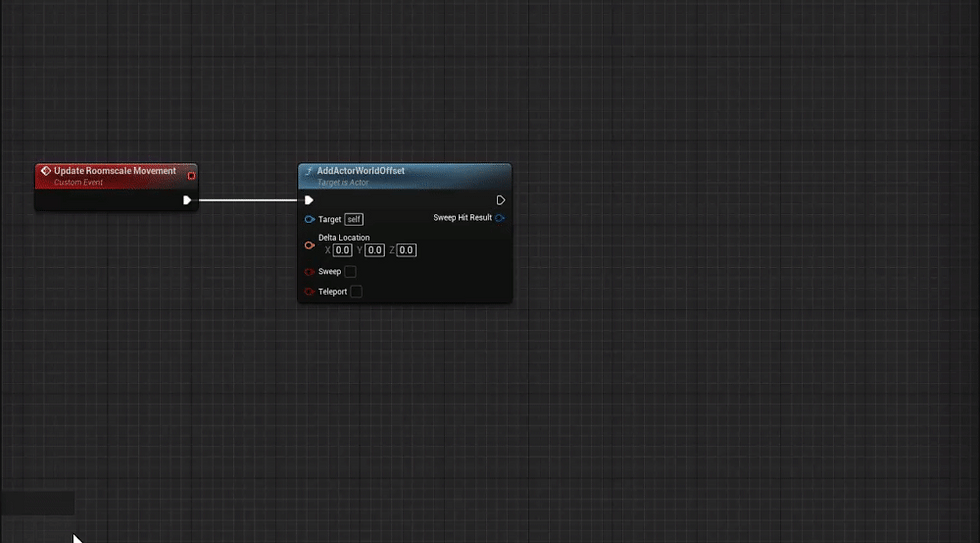
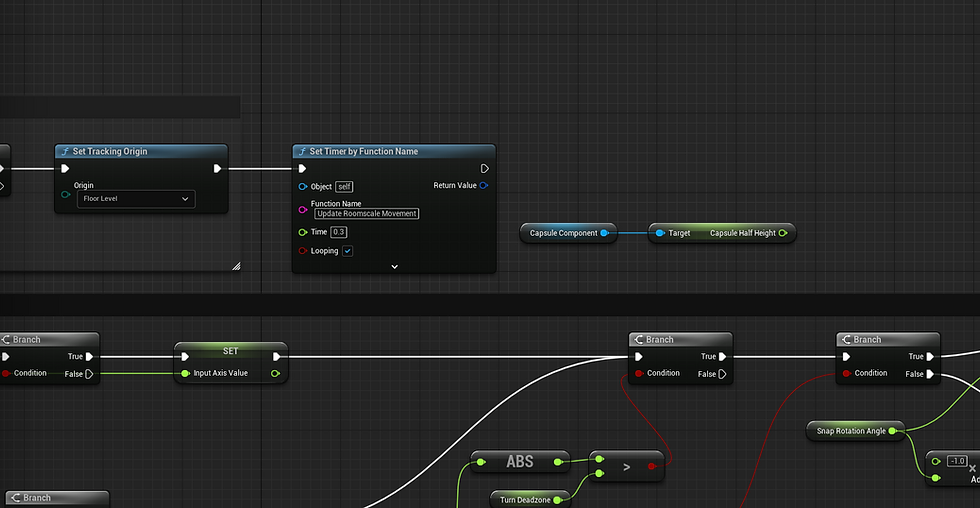
So to make our player work with the room-scale movement were going to start by finding some free space in our event graph and creating a custom event called Update Roomscale Movement. I'm actually going to do this to the right of our snap rotation code we added.

Now we have our custom event we are going to drag of our execution pin and search for Add Actor World Offset and from that, we're going to drag off and search for Add world offset (VROrigin).
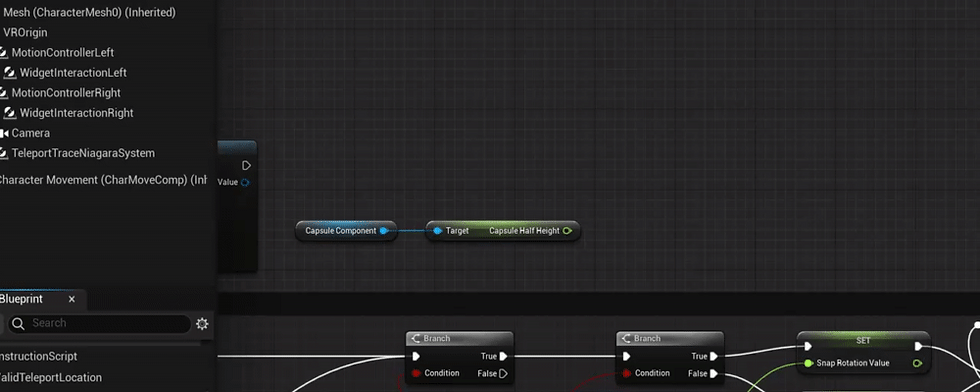
We now need to get references to both our Camera and Capsule components. We can do this by selecting both in our content browser and dragging them into our event grap.

After adding both of them we need to drag each one and Get World Location functions which we will then subtract from each other like so. (Make sure the camera node is above the capsule node). And we also need to split the output pin from our subtract node.

We can now connect the X and Y from our subtract to the Delta Location X and Y of our Add Actor World Offset.
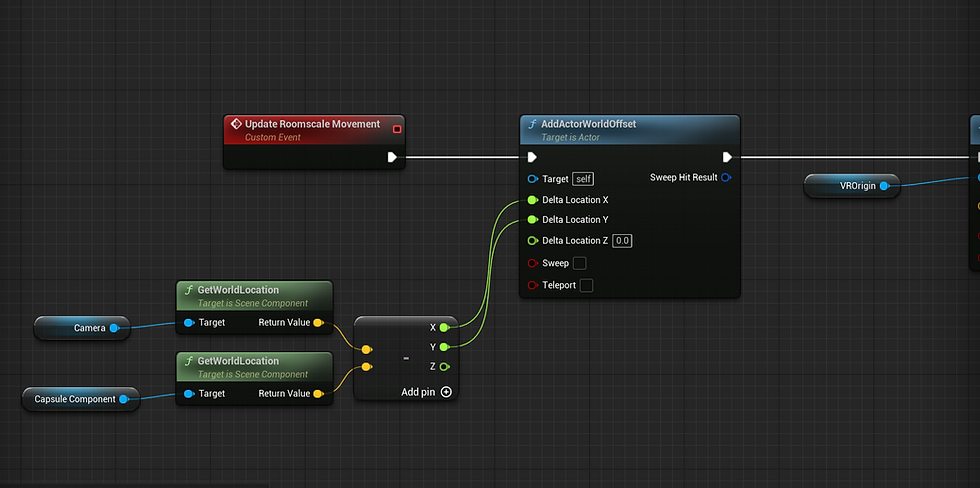
Now we need to create a Negate Vector node and we will split the left in to access the individual axis floats. We can now connect our X and Y values from the subtract node to the A X and AY Float values of the negate vector.
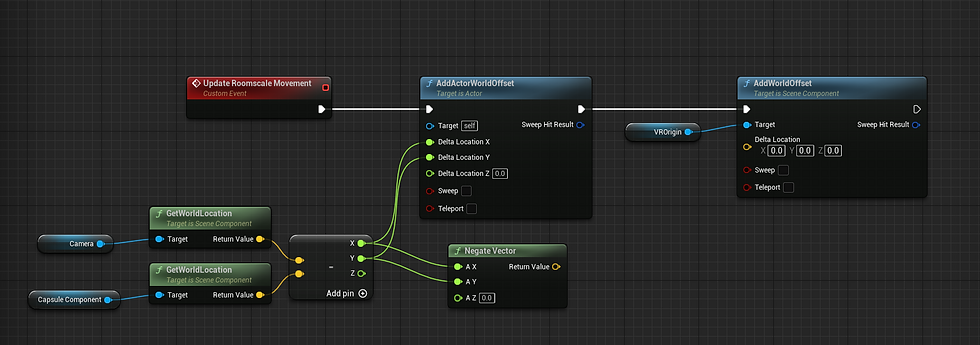
Now we've done this we can connect the Return Vector to the Delta location of our Add World Offset. Like so.

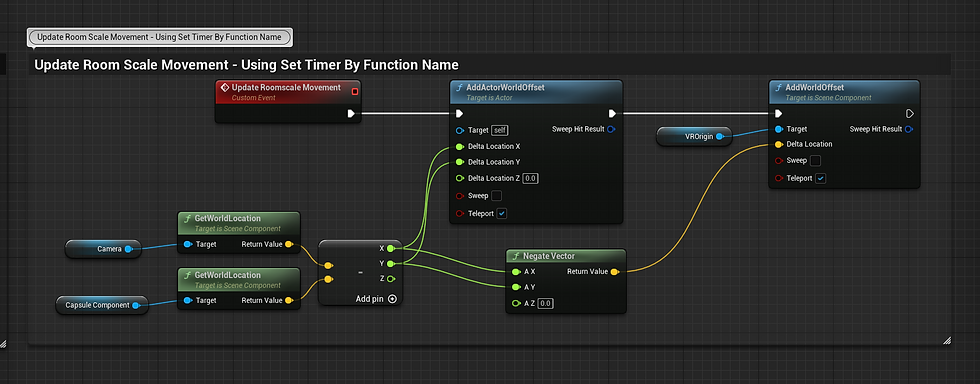
Before I Forget we also need to set Teleport on our Add actor world offset to true and do the same for our add world offset

If you've worked with blueprints in the past you would have noticed that we aren't firing our Update Roomscale Movement Event. This is what we're going to do now. And to do this we need to find our Event Begin play node located at the top of the Event graph in the original template. It should look like this.

Now if you remember back I explained that we won't be using event tick but we do need a timer to repeatedly fire our event so it updates periodically. and to do this was going to use a function called Set Timer by Function Name. This lets us say "Get this event and fire it every X seconds, and also make it loop). The lets us stagger when our code fires considerably improving our performance.

Now we can copy and paste the name of our Custom event (Update Roomscale Movement) into the Function Name variable. And Set our Time this can be anything you want but it's important to note that the lower the value the faster your code will update and it's not necessary to update this quickly.
I found a value of 0.3 worked extremely we and spaced out the events firing quite nicely. but use a value that you think works best for your game. If you need it to be extremely accurate then a value of 0.15 should work just as well. We all need to make sure Looping is ticked.

If you want to test if your player capsule is now updating you can set the capsule component Hidden in-game to false and jump into the scene. If you look at the ground you should now see the capsule moves with the headsets as we need it to.

Now our capsule follows our player we can add a comment around our code.
Now we have our capsule following our player we can now start working on changing the height of the capsule to allow our player to crouch beneath objects and actors.
6. Dynamically setting the height of our Player capsule.
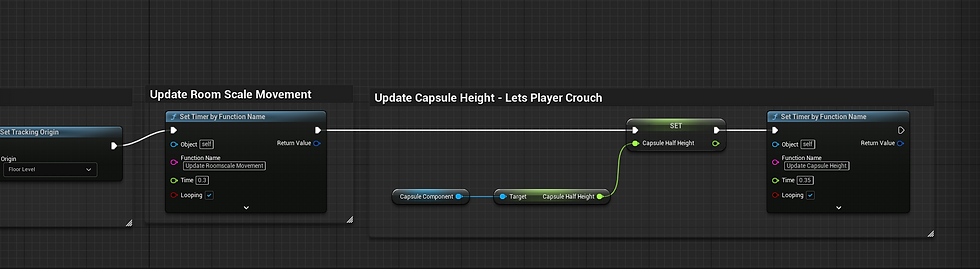
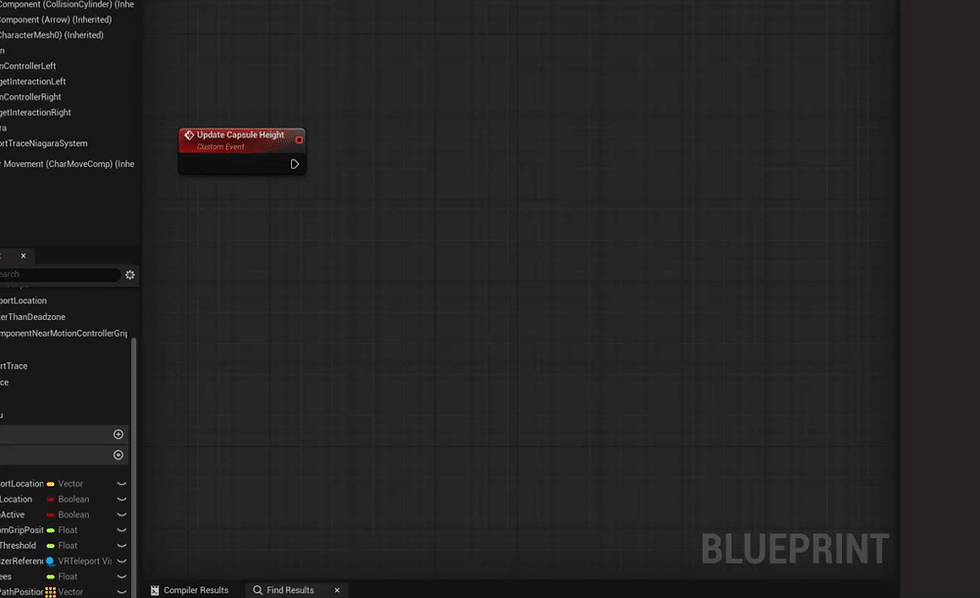
Again we need to find some spare room in our event graph and create a custom function called Update Capsule Height.

Before working from the Update Capsule Height event we need to head to our Event to begin play code as we need to add some code there first. We need to start by getting a reference to our Capsule Component and then dragging off from it and getting our Capsule Half Height.

Now we have a reference to our Capsule Half-height we are going to right-click the pin and promote to variable and then connect it to our event begin play.
While we're here we are going to copy and paste our Set Timer by Function Name and use it to update our Update Capsule Height event. But we are going to change the Time to 0.35 so we aren't firing the timer at the same time as our other one.

Your event begin play should now look like this. I also added comments so I know what each part does.
We can now go back to our Update Capsule height event we created.
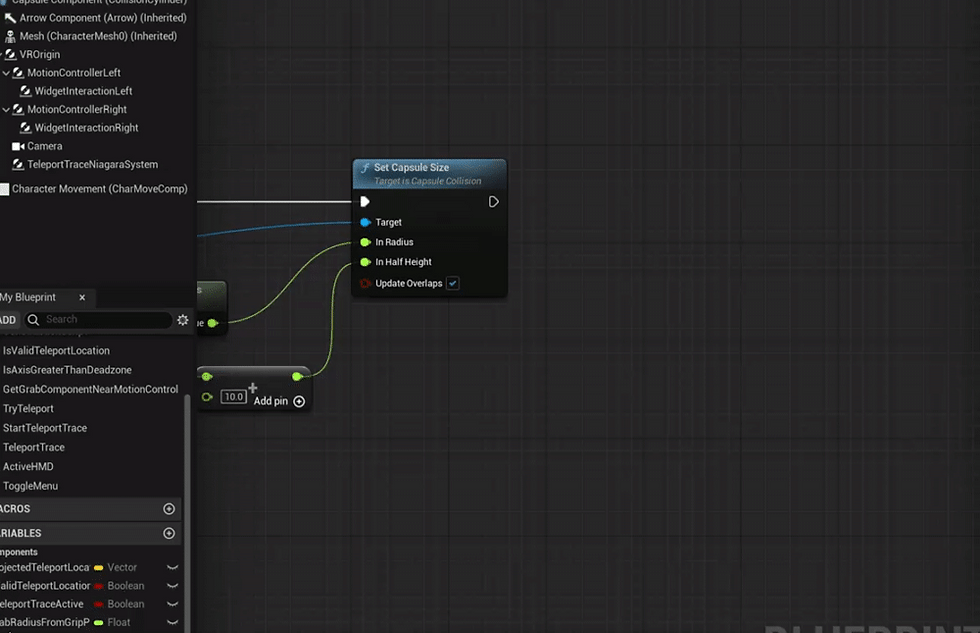
We are going to start by creating a set capsule size function and making sure it has our capsule component.
From our Capsule Component, we are going to drag off and search for getting Scaled Capsule Radius. And attach it to our in Radius.

We will now set up our In Half-height and to do that we need to first get an Orientation and Position function where we will split the Device Position pin. So it looks like this.

From our Z input, we are going to divide our z position by a value of 2. To get the divide node you will need to use / in the search box.
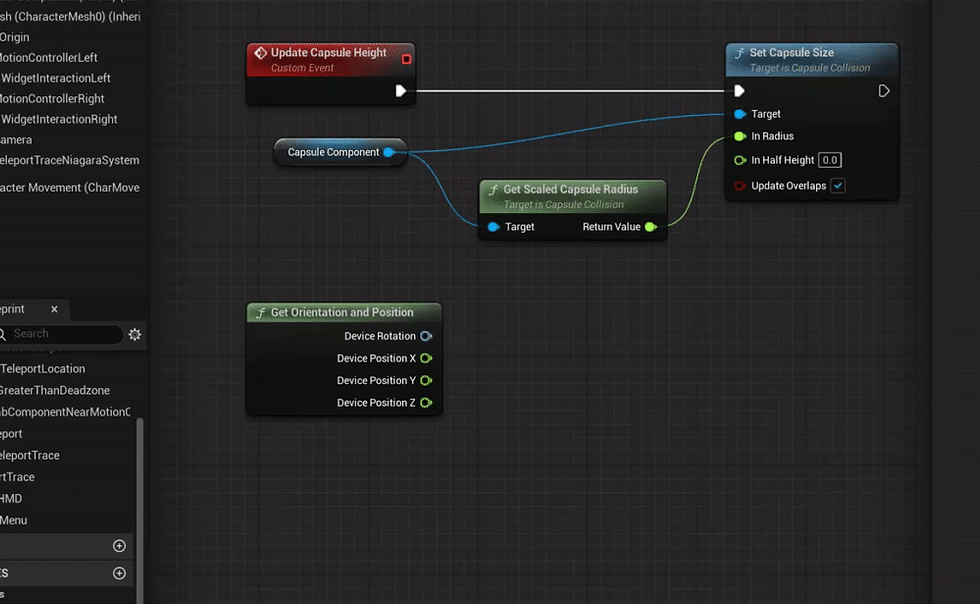
From our divide node, we now need to add 10 to the value this adds a little bit of capsule to accommodate the top of our head, or we would clip through things in the scene. We will connect our new add node to our In Half-height input.

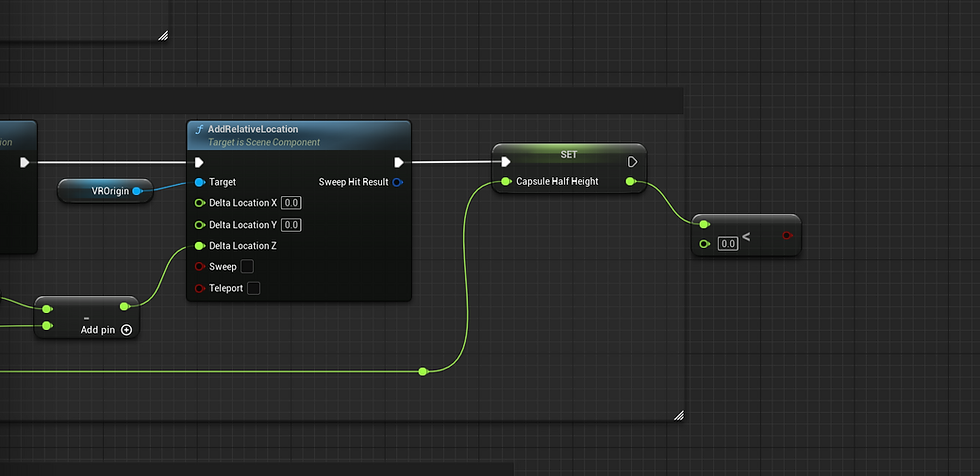
Now we can drag of our Set Capsule Size function and create an Add Relative Location function with the target being our VROrigin component. make sure to split the Delta Location pin so we can access the axis floats.
We can now drag in a reference to our Capsule Half Height float variable we created earlier. which we will subtract from our

After setting up our Minus node we then need to connect it to our Add Relative Location Delta Location Z.

From our Add Relative Location, we can set our Capsule Half Height float again. by connecting it to our +10 node like so.
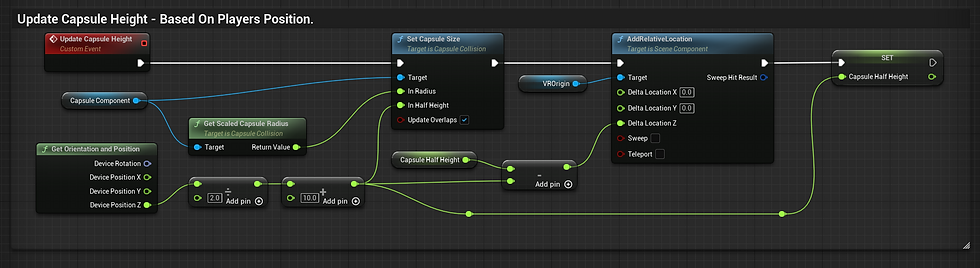
I also commented, the section so we understand what's happening. Were now going to make it so when the player physically crouches in the real world the player will actually move forward slower than when there stood up. To do this we need to drag from our Capsule Half Heigh and check if our value is < less than a specific value.
We are going to promote the Less than Pin to a variable called Crouch Height so we can have control over the value if we want to. I personally found a value of 60 works well. for this and we will be able to test it properly after we set up our movement controls.
Now we have our custom crouch heigh set to 60 (Lower the number the lower you need to crouch) We can add branch nodes. Were now going to get a reference to our Character Movement component as we are going to modify our walk speed.
With our reference in the viewport to the character movement, we can now set our Max Walk Speed when we crouch. I'm actually going to set this to a value of 150.
We can then duplicate the Max Walk Speed Set node and connect it to our character movement and the False channel of our branch and give it a value of 300.

It's important to note by default the player's max walk speed is 600 by default but we will be changing this later to 300 as it's more comfortable.

Now when we crouch down and our Capsule Half Height is less than 60 units our character will be crouching where we then change the speed of our player.
Meaning we can now move on to adding in our Movement controls so we can start walking around our scene.
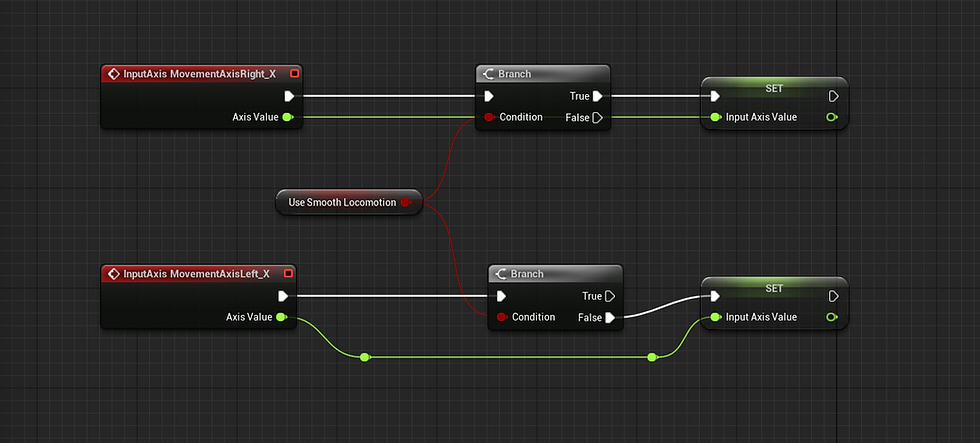
7. Adding Thumbstick movement so we can walk around our level.
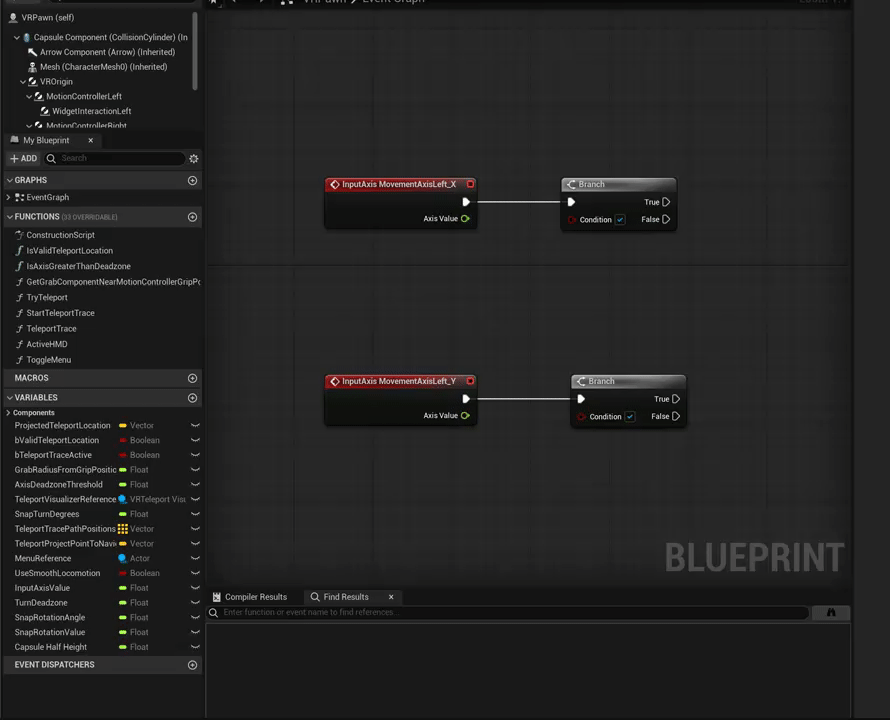
The first thing we need to do is create and InputAxis MovementAxisLeft_X and a InputAxis MovementAxisLeft_Y. So we can access our thumbstick events. Again. just find some free space.

Both sections of code will be the same with the exception of one node later on which we will change so we are going to work on both at the same time.
Starting by adding a branch to each event and dragging in out UseSmoothLocomotion Boolean we created early on.
We now need to get the absolute value of each of our axis values.

We now need to create a new float variable called Movement Deadzone with a default value of 0.2 this will stop the stick movement from being too sensitive. You can always change this value to something else if needed. And we are going to check if our Absolute value is greater than our Movement Deadzone.
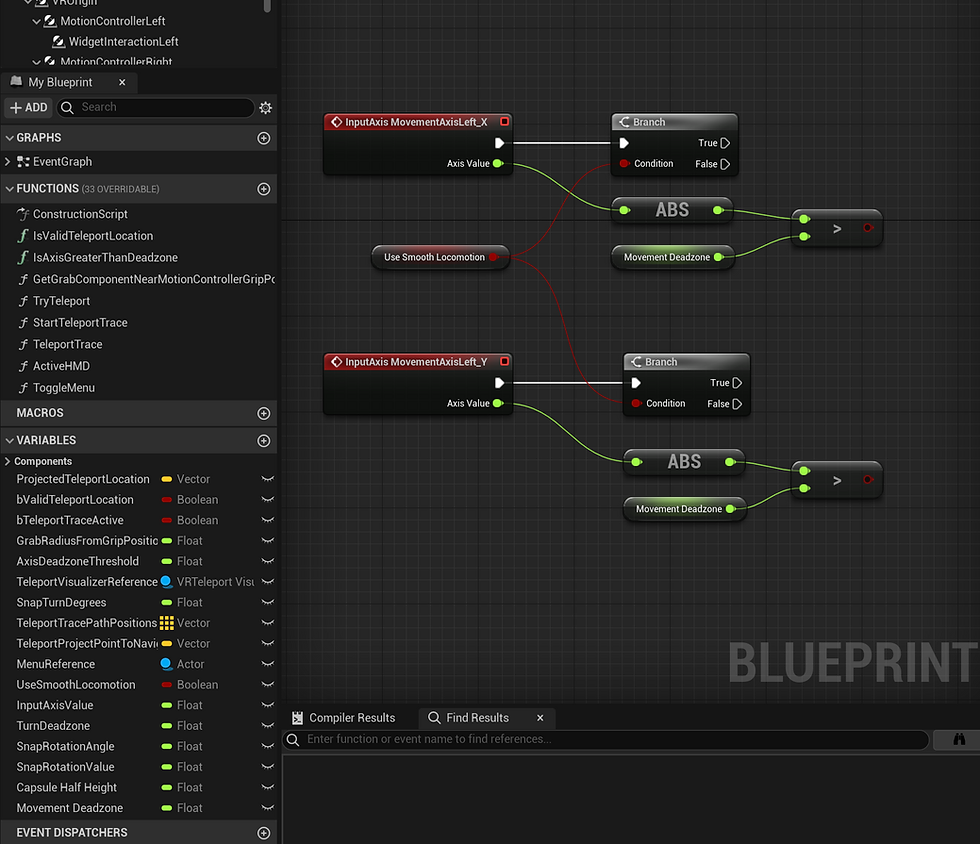
We can now add a second branch to each of our lines and connect them to our greater than nodes like so.
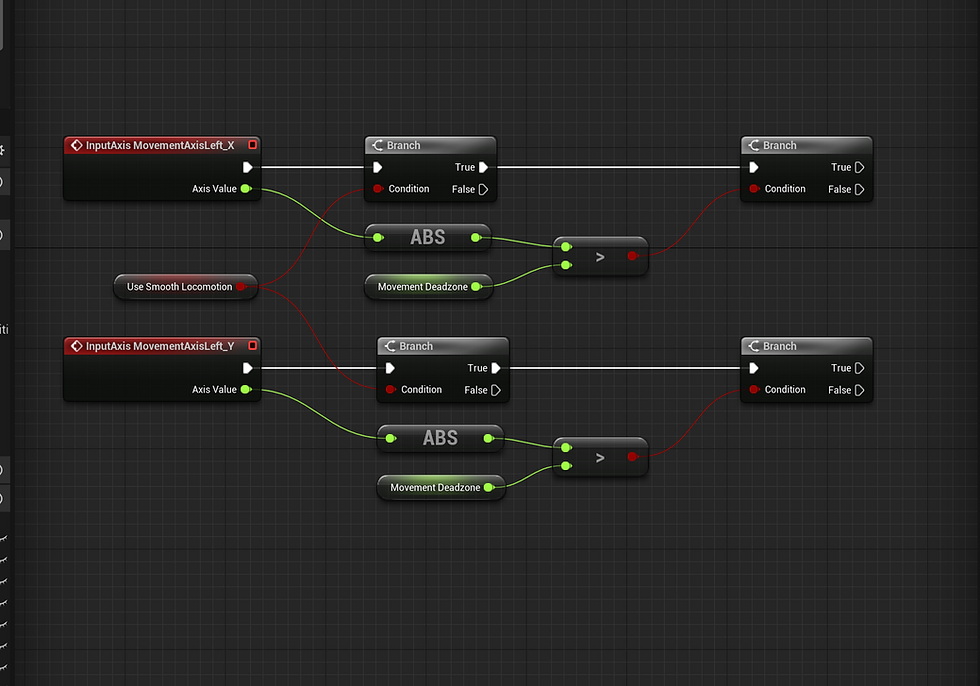
Now from our Branches True values we can create an Add movement Input node. Once created we can connect our Scaler Value to the Axis Value in our events.

Our Graph should now look like this, Were going to keep going by dragging in a reference to our Pawns Camera as were going to use this to control our movement direction.

From the camera which will be connected to the Left_X Axis we are going to drag off and Get Right Vector and connect it to the World Direction pin. From the camera attached to our Left_Y Axis we will Get Forward Vector and connect it to the world direction pin as well.

Before we move on top of adding our Jump and sprint controls we need to find our existing code commented Movement AxisInput Righ - Teleport. The section of code looks like this.

We are going to add a branch node directly after our InputAxis MovementAxisRight_Y.
This will let us choose between or smooth locomotion system and the teleportation system already included in the template. make sure the rest of the code is connected to the False condition. That way if UseSmoothLocomotion is false we will be able to teleport.

Now we can use our UseSmoothLocomotion Boolean we created earlier for the condition.

Now we can set up our Sprint and Jump controls.
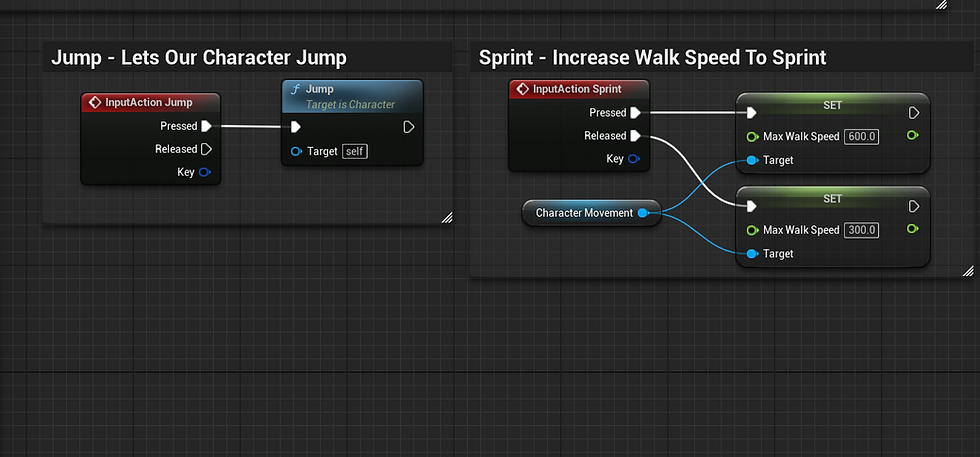
8. Setting Up Jump and Sprint.
This is possibly the easiest part of our code to create and set up. But before we do I want to show you how to change the movement speed of your player. As we're going to change it now.
In the top left of the window where we have our components, you will need to select the Character Movement (CharMoveComp). This will open a details panel which we can use to change variables related to our player.
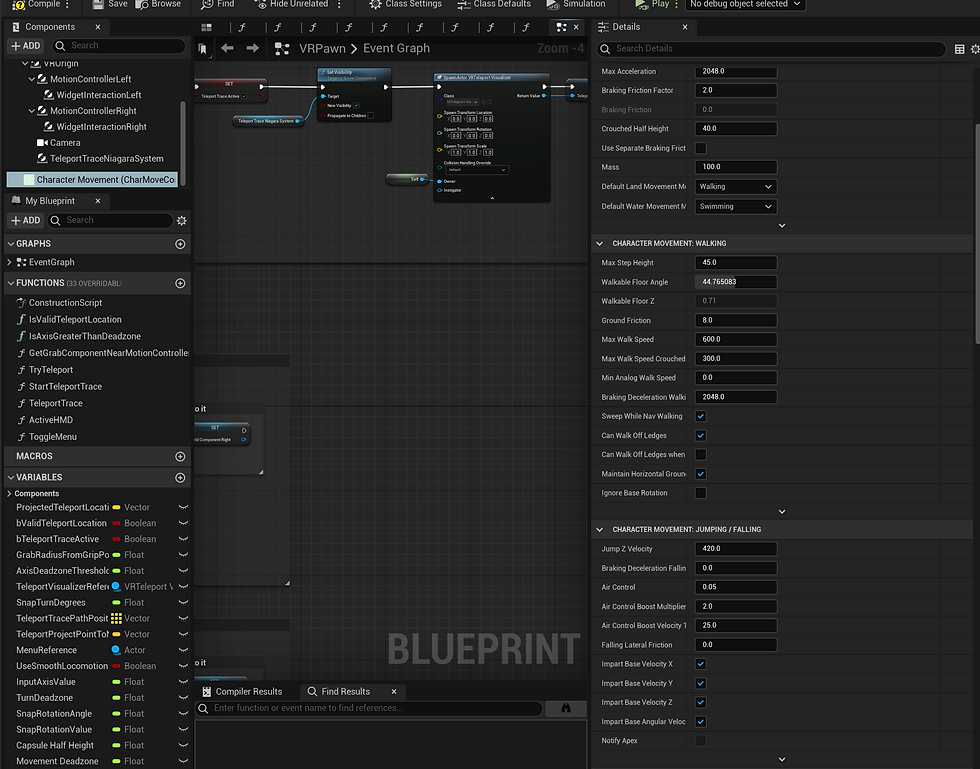
You can see here that our Max Walk Speed is set to 300. I'm going to the value as I find it more comfortable but you can always modify this to what works best for your project. Just make sure to change the Max walk speed for our crouch section so it matches.
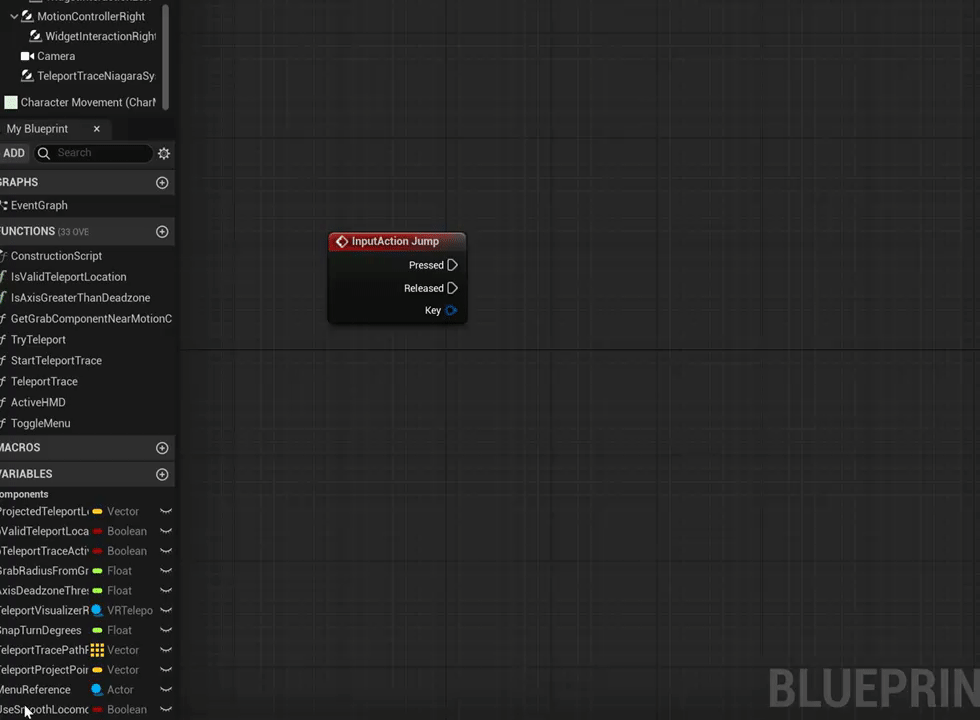
Now we've changed our Max Walk speed we can set up our Jump and Sprint. Find a blank space in your event graph and you will want to right-click and search for InputAction Jump.

Now we have our InputAction Jump we can drag from the Pressed Exec and search for "Jump".
And that's it for our jump mechanic we can now add sprint controls to our project. For this we just need to search for the Custom Input Axis Sprint we created earlier similar to the jump event.
Now we have our Sprint we can bring in a reference to our Character movement and create two Max Walk Speed floats similar to the crouch set up earlier.

Now we have our Max Walk Speed values we can set them to our new speed. I'm going to set our Pressed speed to be 600 (double our walk) and then set the released value back to 300 (Default walk Speed).
Now I can comment both sections of the code.
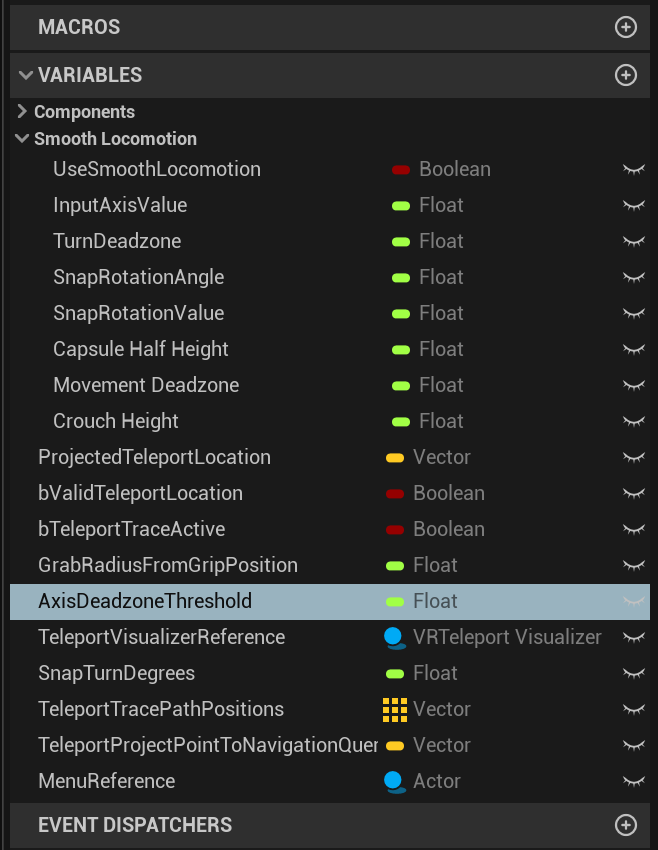
Now we have complete all our movement code I'm going to put all my variables into a new category called SmoothLocomotion to keep everything organised.
Do this by selecting a variable and in the details, panel find the Catagory section then change Default to a name you want.

After naming the first variable a group is created and you can use the drop-down to organise it. Mine looks like this now.
So if you jump into the project now you'll see it works exactly how we want it to with the exception of grabbing and picking up an object which now doesn't work So That's what we're going to focus on now and get working.
9. Fixing Our Interactables and Grabbing Objects without Moving.
Before jumping over to our pickup actor and grab component we actually need to make some changes to the pre-existing code.
In our event graph, we need to open the GetGrabComponentNearMotionControllerGripPosition Function as this is where we will make our changes. Double click to open the function.
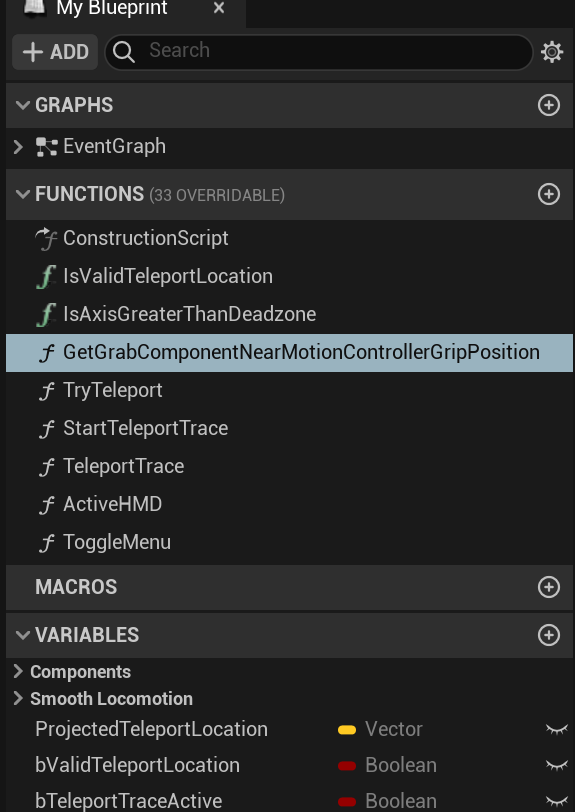
Once open it should look like this.

Here we are actually going to remove a portion of the code we can see in the screenshot.

You can see here I've highlighted a section of code. This is what I'm going to disconnect. The reason for this is it currently doesn't update the grip position of our motion controller making us unable to pick up our actors.

Now from the Motion Controller variable still remaining we need to drag off and search get World Location. And then connect it to our Local Grip Position.

If you test your project again you will find that you can now pick up and grab objects like before but if you try moving while holding an object you'll move rapidly around the scene.
Now we can open up our GrabComponent. add make an update in there.
In our, GrabComponent make sure you in the Event Graph. Here we're going to change the In Collision Profile Name to VRInteractable. You'll remember this is the name of the custom Collision we created earlier in the tutorial.
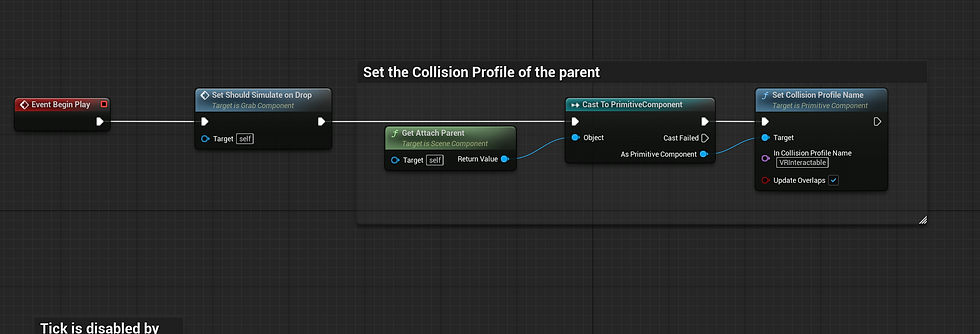
Now that's it for our Grab component. we next need to open up our Grabbable objects. In this case the Grabbable_SmallCube. Here we are going to select the StaticMesh Component and set its Collision Preset to our custom preset VRInteractable

Now repeat this step with the interactable gun.
10. Adding options to the in-game menu to switch between teleportation and Smoothlocomotion.
Now we have everything completed we can now add the option to switch between Smoothlocomotion and teleportation in the game. Using the Widget Menu already included.
Because I'm using the Valve Index aI'mctualy going to change my inputs for this as by default the menu is mapped to the Valve Index System button which doesn't allow me to open it so I'm going to remap it to the Left B Button.
This will now let me open the included menu. This is where we will add or button to switch movement types.

Now we have our menu open we can add a horizontal box to our Verticle box.
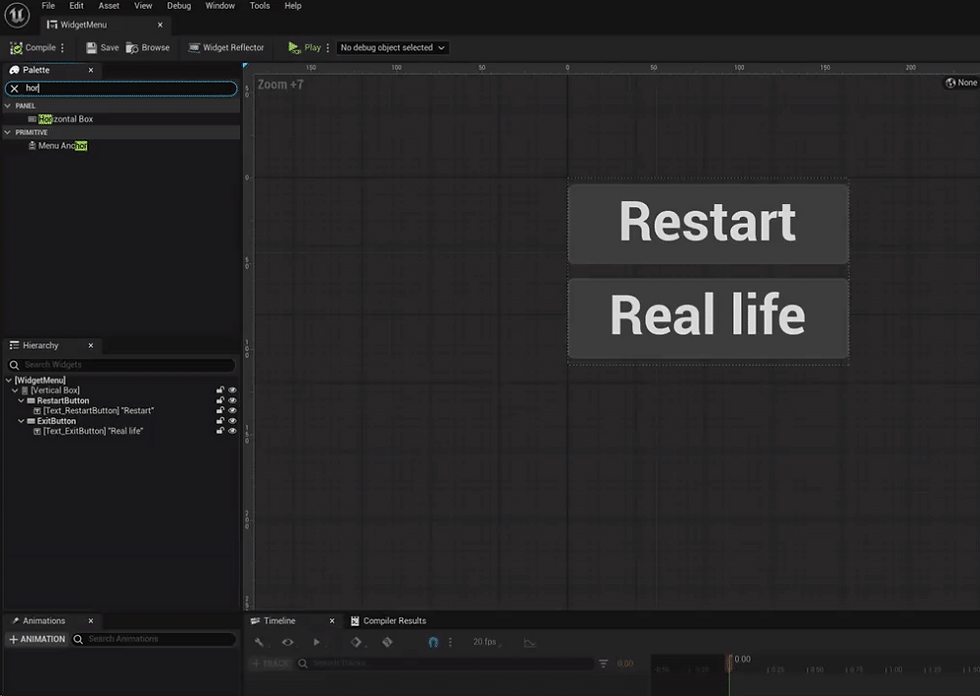
We can now add some text to our Horizontal box as well as a check box. So we know what it is.

Selecting the text we can change the text in the details pannel to what we want it to say. For mine, I'm going to put "Use Teleportation"

I'm also going to add padding to the right of a value of 4 so the tick box isn't as close.
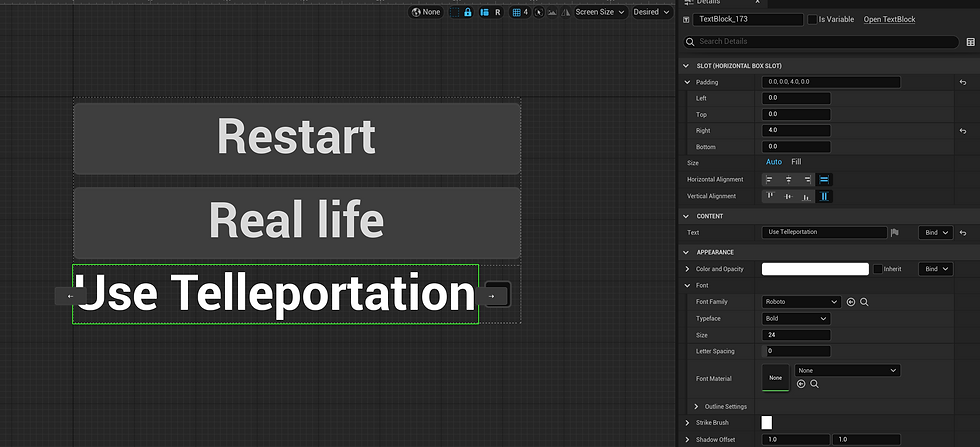
I also renamed the text and the check box so there easier to find.


We can now jump over to the Graph and start writing our code.
Were going to start by selecting our CheckBox_UseTelleportation and creating an On Check State Changed.

We can now get a reference to our player pawn and cast to it. (You will want to cast to whatever your player is called).


we now need to add a branch and connect the condition to our is checked from the check box event.

Now from our VRPawn cast, we can set our Use Smooth Locomotion bool which we created early on.
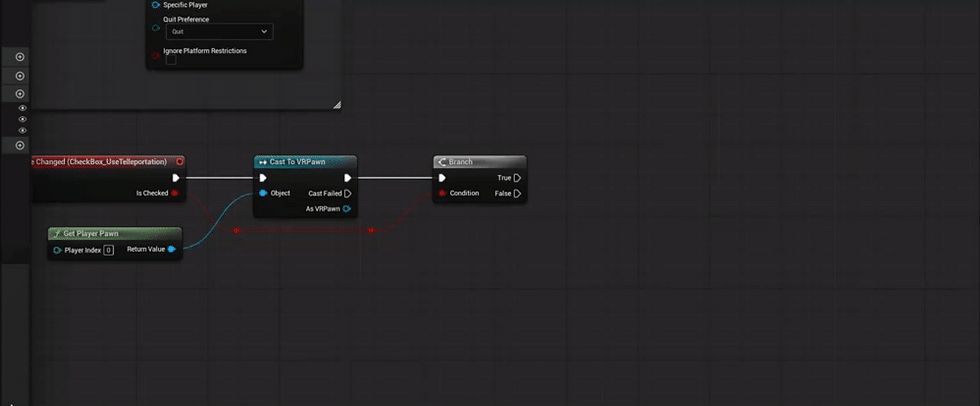

We now want to set the Bool from our true channel to be true as well. So when the tick box is checked we will use smooth locomotion but when it's false we will revert back to teleporting.

We now need to use Event Construct to fire some code for us to set the tick box when the menu is selected. We will then cast the same as we just did to get the Use Smooth Locomotion Bool.
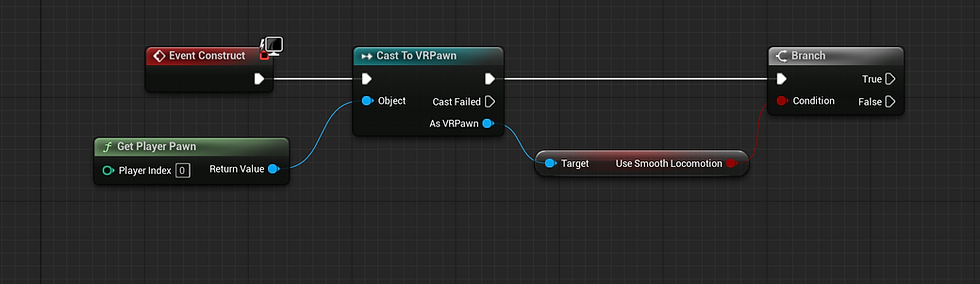
We can now drag in a reference to our Checkbox and use it to set the checked state. Making sure we have two and the one from true is checked and the one from false is unchecked.

Now that's it. You might need to restart the project due to an Open XR bug but other than that you should be good too. I'd love to see how you use it for your own projects.
If this helped and you'd like to support tutorials like this why not head over to my Patreon where I have a variety of VR content available for download as well as one to one tutoring if you need help.
If you enjoyed this or found it useful please consider Subscribing to my Youtube channel where I post regular VR Tutorials for Unreal Engine 4 and Blender.
If you're looking for somewhere to hand out or need help with something VR, Game dev or 3D related maybe consider joining our growing discord community of over 300+ Vr developers.
Until next time, stay safe and I'll see you then.
Bye.


How in god's flat earth is this not part of the native UE VR template??? I have to spend a day just to get basic movement without teleporting?