How to create, host and add JSON data to your UE4 projects for free.
- Jonathan Bardwell
- Jun 15, 2021
- 11 min read
This tutorial was made possible by my Patreons. If you'd like to support more content like this please consider subscribing to the GDXR Youtube tutorial or by becoming a Patreon: https://www.patreon.com/GameDevXR
In this tutorial, I'm going to show you how you can create your own JSON files, host them for free online and then pull the data directly into your Unreal Engine 4 project. Making it easier and quicker for you to change data inside your projects after it's already been built and published to a device.

To follow along with this tutorial, you will need:
- Github Account (5minutes to update data)
- VaRest Unreal Engine 4 Plugin (Free) available from both the Unreal Marketplace or Github.
- Unreal Engine 4.25 or 4.26 I'll be using 4.26 for this tutorial.
- JSON Editor Online (Website) I'll be using this to help create our JSON file.
1. Installing and enabling VaRest Plugin.
Possibly the easiest part of the tutorial is installing the VaRest Plugin. I'll be using the Epic launcher to do this since it's so much easier to do. Start by heading over to your Epic Launcher and heading to the marketplace and searching for VaRest. Or you can follow the link: https://www.unrealengine.com/marketplace/en-US/product/varest-plugin
It might say sign into BUY but it should be free after you sign in.

Once you've "purchased" (It's free) the plugin you will be given the option to Install to Engine. In this case, choose the engine version your using and install it. I'll be using 4.26 for this tutorial.
Now it's installed you will need to create a new project and activate the plugin. I'm going to create a new project. I'll be using the First Person template for this one but it does work for any.

When your project loads you should see this window appear in the bottom right of your screen. Select Manage Plugins and search for VaRest. Enable it and then restart the project.

With the plugin enabled we can now look at creating our JSON files. But before we do that I'm going to cover what JSON is and some examples of how it could be used for those who are new to it.
2. What is a JSON file, Brief intro
It's important to note that I won't be going too in-depth with what JSON is or but aim to give you enough of an understanding so you can read a JSON file when looking at one.
So, what is JSON?, also known as JavaScript Object Notation is an open standard file format and data interchange format that uses human-readable text to both store and transmit data objects consisting of attribute-value pairs and arrays. Basically, it's a list of readable information for both a human and a pc. This means we can write data in a JSON format (Easier for humans) then direct code and then the application reading the information can also understand it.
JSON was created due to the need for real-time server-to-browser communication without needing other plugins (In our case we need one). But for a website to the server communication they don't.
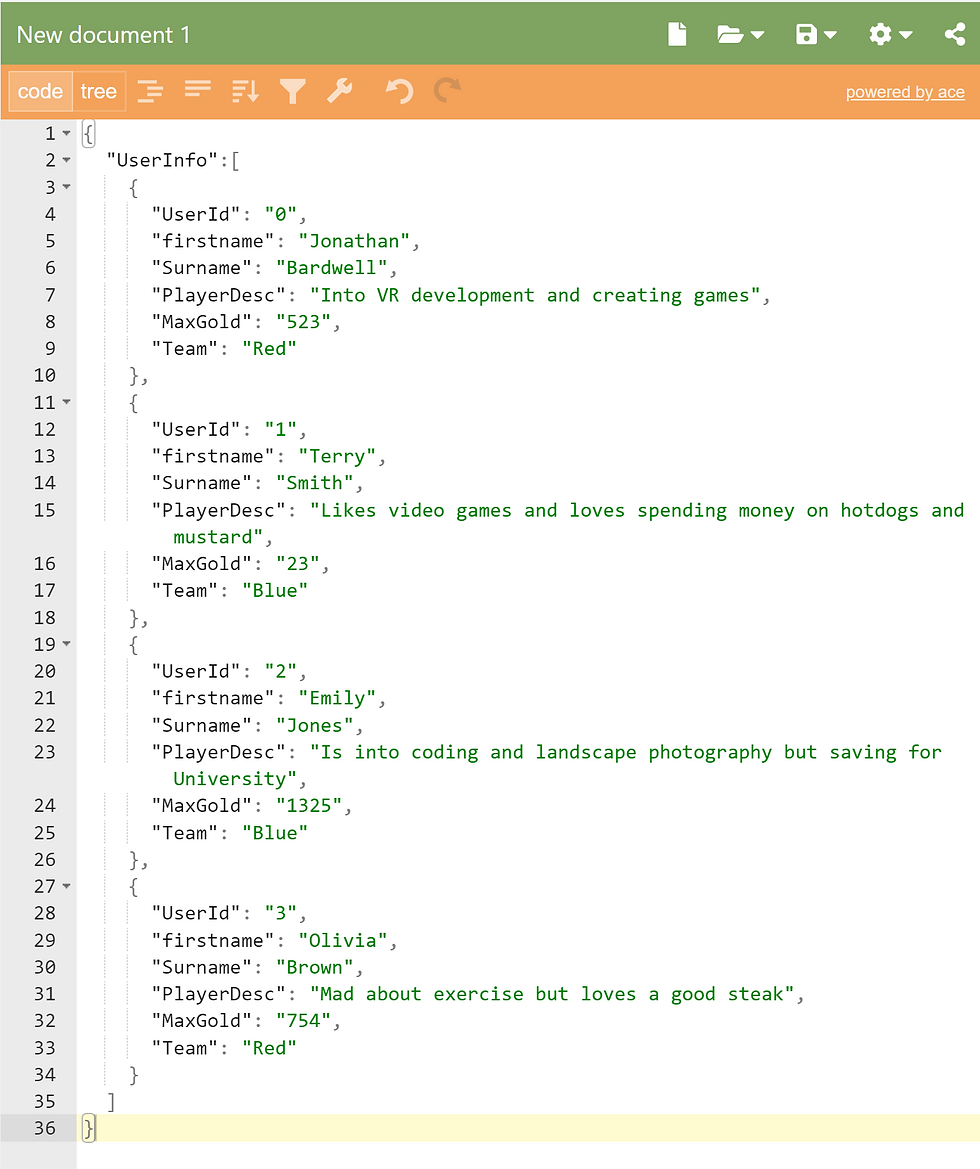
Rather than talking about history forever, it's probably best if we look at an example of a JSON file. As you can see below, I created an extremely simple example of a JSON file containing some Users information.

As you can see from the code above we have a section called "UserInfo" and inside we have an array with two lots of information. don't worry if you don't know how to read it. To understand it it's best if we look at JSON Syntax. Once you know this it's much easier to understand.
3. JSON SYNTAX
Is important to understand what type of information a JSON file can support since this could possibly cause restrictions. There are six types of data that a JSON file can support:
Strings = Text, "Hello World" it's important to note that any string/text is surrounded by semicolons or python won't know its text.
Numbers = well, numbers. 10 2.5 5.4 etc. Numbers, however, don't need to be surrounded by Semicolons
Booleans = True or False values. IF you have a setting that needs to be on or off you would use a Boolean.
null = nothing. Null is often used if you have a section of information and it contains no information for example in the image above, if Jonathan has no email it would read "email": null so JSON knows there is no information there.
Arrays = [ ] , arrays are repeating information and are represented with square brackets so any information inside of these square brackets can be read separately as long as they're separated by curly brackets and a comer.
Objects = key-value pairs, this lets you create information like what is displayed above. for example we have our Key "firstname" followed by our value in this case a string "Jonathan"
It's uncommon for a JSON file to be used to only contain a single type of data. But in most cases, a JSON file will typically use Arrays or Objects. Which can then store different types of information.
4. Writing JSON
We've now looked at JSON Syntax meaning we can now look at how we can write it.
Because I'm aware not everyone reading this will have access to an IDE (Integrated development environment) like VisualStudio or XCode I'm going to use a website called.
I personally decided to use this since I didn't need to download any external programs and it's very quick at showing any mistakes you may have as well as the ability to help you write it.
In this example, were going to write out the example I created above. I'm doing this because it includes multiple data types as well as an array of information which we can then use inside Unreal Engine 4.
When writing JSON it's important that we put all of our data inside some curly braces. Like so. This pretty much tells our program where the start and end is.
It should look like this. I've pressed the tab a couple of times to give me some room to write in.

The next thing I'm going to do is create a field. basically, a string that lets us identify our array. And I'm going to call it UserInfo. It's important to note that a string must be surrounded by quotation marks and since this is the end of our key it will be followed by a colon. Inside Unreal this will be our array field so we know where our array data is being stored.

The next step is to tell our JSON file that we want an array. Were going to tell our JSON file that we want to add an array by adding in some square brackets directly after our string (Array field). Any information inside of these square brackets will be an array. This will make more sense inside of UE4 later on.

In the example above you can see that I've created a string called UserInfo followed by an array. In Unreal this is known as our Array Field which then lets us access the array of information stored in it. And we can split up our array data by adding another set of curly brackets like so.

Now inside these curly brackets, we can add any information we would like to. Because this tutorial is just covering how to create and pull data into unreal I'm going to keep this relatively simple but you can go as in-depth as you'd like. For example, I'm going to add a couple of objects. Remember Objects are Key Values meaning they have a key and are then followed by a value of some kind, in this case, were going to have a mix of numbers and strings.
So the first thing I'm going to do is give my User an Id, I'm doing this because it helps me know where in the array the user data is stored this will make more sense later on.

It should look like this. Where we can now add in the UserId information in this case I'm going to add "01" You'll remember previously I said numbers don't need speech marks. however, because this is a key containing a value it does.

Since we've finished our line and data entry into our object we need to add a comma to indicate the end and that the array is still going. So I'm going to repeat this process with the new information and come back.

So I got a bit carried away and decided to add some more information that we could use in our game. What I'm going to do now is add two more characters, This will allow us to choose which player we will view in our project. It's important to know that when we finish our array of information after our curly bracket that we use a comma.

As you can see I've been through and added four different users and gave them a variety of information that we can use in our project. The reason for adding such a variety of information is to show how we can set it up for the information to be used. Now we have our JSON file we can look at hosting it online so we can pull down the information.
5. Hosting Our JSON file online.
To host our JSON file I'll be using Github since all you need is an account with them and most likely if your coding. You already do. https://github.com/
It's very important that I stress that hosting with Github has one issue and that is the speed of updating information. GITHUB CACHES THEIR DATA AND ONLY PUSHES CHANGES ONLINE EVERY 5 MINUTES SO YOU WILL NEED TO KEEP THIS IN MIND WHEN MODIFYING ANY DATA.
Using JSON files that require updates faster than every 5 minutes may require another hosting platform or service but in most cases, information isn't updated that frequently. or pulled down that frequently either. If you plan on using this for a multiplayer project you may want to store your JSON files on the same platform. For this example, though our code will run on Event Begin to play meaning it will only load when the game or the level starts.
Now we can Open up our Github and make our way to our Account Overview.

I'm using dark mode but it should look something like this. And then at the top, you will see a tab called Repositories, Were going to use this to create a new one for our project. Now select the green button "New".

Now we can name our repository and give it a description. For this example, I'm going to call it GDXR-JSON-Tutorial and also give it a brief description.

In this example, I also don't mind if the information is Public so I will leave it as default and we also don't need to Initialize our project with and extra files. We can now hit Create Repository.

You should then see a screen that looks like this. We're actually just going to use create a new file option (Blue Text) at the top there.

It's important to make sure you name the file something related to your project and to end it with .json this will tell GitHub were using a JSON format.
Now we can copy and paste our JSON code directly into our GitHub file.

Now you've pasted it into GitHub you will see at the bottom of the screen a big green button that says Commit new file. This is our save button.
We will commit a new file and you should see the window change. were now going to select our file again to open it and look for a button at the top of the window called Raw. this is where we will get our location from.

I recommend keeping the Raw page open as we will need the URL link in UE4. Now we have our JSON code hosted online we can go into UE and look at pulling in the data using VaRest.
6. Adding JSON to our ue4 project.
There are plenty of ways to display information in ue4 but what I'm going to do is create a BP with a widget component so we can drag multiple instances into our scene and display different information. I won't cover this in-depth but will show you briefly what I have.

You can see in this example I've created a widget in the scene that has sections for the information were after followed by a text block. The text block will be where we display our information.

I've also been through and made sure all of the text blocks are set to variables so I can access them inside the event graph as ill be pulling the JSON directly into the widget. but it can also be pulled into the level blueprint or even player character directly. But for now, we will stick with adding it all inside the widget.
The first thing we need to do is open our event graph and search for VaRest Subsystem.

We will then drag of and search for Construct JSON Object. And Connect it to our Event construct.

now from the Return Value of the Construct Json Object we can drag off and search for Call URL.

Make sure to connect the Va Rest Substysem to the Call URL Target pin.
We can now add our URL from the RAW Github file we created earlier.

Now to create our Delegate normally you could right-click and create a custom event however this won't work. you will need to drag off the red pin "Callback" directly and then create the custom event from it.

We can now use the request pin to get our response object.

This will allow us to get the array field if you remember back to our JSON file we named our array field "UserInfo" we will need this to find our arrays. where we will then use a Get node to allow us to choose which array we want to get the information from.

This is where my user id comes in handy. As it helps me know which array of information ill be receiving for example 0 will be Jonathan, 2 will be Emily and so on. I'm actually going to promote this to an integer so I can change the value in the level.
we will then drag off the get node and create a function called "As Object" this will then convert our array and allow us to get the information.

We can now use Get String Field to pull in our first name and then repeat it for the other sections. We just need to set our Field name to the text we would like to pull in.

Now that we have all our Get string Field added we can add some print strings to make sure our data is being pulled in.

We can see it being displayed in the top left there and if we change our User ID integer we will get the others two.

And that's pretty much it for pulling in information. I'm going to go ahead and connect it to the widget so we can display the information.

So this is my widget set up populating the information as required and the BP containing my User id has a cast node so I can change it in game.

Like so. So now I can drag and drop the widget into the level 4 times and change the id to get individual information.

Now when we press play, we should see all four update and change colour.

And that's how you can pull in JSON information using Unreal Engine 4.
If this helped and you'd like to support tutorials like this why not head over to my Patreon where I have a variety of VR content available for download as well as one to one tutoring if you need help.
If you enjoyed this or found it useful please consider Subscribing to my Youtube channel where I post regular VR Tutorials for Unreal Engine 4 and Blender.
If you're looking for somewhere to hand out or need help with something VR, Game dev or 3D related maybe consider joining our growing discord community of over 300+ Vr developers.
Until next time, stay safe and I'll see you then.
Bye.


Comments